
A Big Thank to Simon for the Photos and Info
Design Tips of Simons 160m Helical
Antenna specs are as follows
old antron 99 or solarcon 99 base section.
at the base hacksaw the first inch from the bottom of the alloy base tube.
remove the top chrome brass feral by slot cutting from the bottom to approx 1 1/4 inch up, and it should just pop off the end, an bring out all the windings with it.
Near the base were the tuning rings are, remove to 2 rings then with a dremal slot cutter.
You need to put 3 slots from top of this to the bottom then just put a flat screw driver in and this part will just pull away.
The alloy base tube, you will need to cut a slot in this from the top to around 4 inch from the base, put a flat bladed screw driver in a gently turn until you hear the bond give way then remove the tube.
You should now have a 66 inch fiber tube, at the tip put a mark about 1/4 to 3/8 inch down and cross drill from one side to the other with a drill bit the same size as the wire you intend to use.
Once this is done measure 60 inch down from the top hole and mark this all the way around,
on this line put a mark that is in parallel with the hole at the top, this is the starting point.
I used pvc covered flexweave to wind the coil up the tube, the trick in getting an even space windings.
You need 150 feet of wire, now then fold it in half and the 2 loose ends are what you start with,
use a zip tie to fasten the end on the mark leaving a 12 inch tail and consistently wind both of these up till you get to the top,
then use another zip tie to fasten it at the top if you have done
this right you should have 210 full turns, and whilst winding this try to keep the wire under tension.
Now you need to fasten one of the ends on its own and once this is done cut the bottom zip tie and un wind the unattached wire all the way up.
You should be left with a nice even coil all the way to the top, once you’re at the top make sure the end of the coil is fastened an cut the top zip tie,
then feed the wire through the hole that you drilled, pull it tight and put a zip tie around the flexweave as close as tight as possible,
all you need to do now is get a lemonade bottle top and cut 2 slits in it with a knife then push it in the end and seal it up.
You should now be left with about 78 feet of wire, so measure about 5 feet down from the end and put a dog bone on then fold the wire back on its self a clamp this using small U clamps.
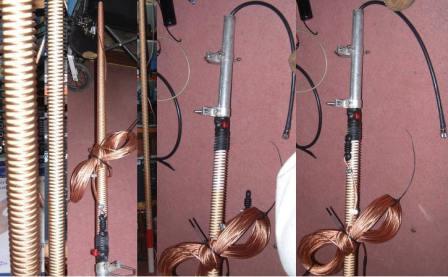
Back to the feed point, just below were the base of the coil is, you need a hole a little bigger than the size of the coax you want to use, slot the coax up the middle of the tube then through the hole,
Bure the end off and solder the centre to the bottom of the coil after trimming the end of it.
The alloy tube also need to be slid over the coax and up to the base of the antenna, make sure that were you cut the slot in this is up near the coil, use a small U clamp to clamp this up to the fiber glass tube, than fasten the braid of the coax to this clamp,
also the more wire you can get out to use as radials the
better or use a good ground spike with the wire connected to the base of the antenna.
Once this is all done mount the antenna on top of a mast and the other end to suitable pole around about 10 feet will be ok,
then all you need to do is start tuning the wire at the dog bone end, at its current length it should have a low vswr at the bottom end of 160 mtrs,
if you want it further up the band start to shorten the wire, I removed around 12 feet in all to get it were I wanted it at the top end.
best 73 de Simon
Simons Antenna Covers as below
a brief rundown of the analyser tests.
VSWR FRQ
3:0:1 1.820Mhz to 1.890Mhz
2:9:1 1.900Mhz
2:0:1 1.930Mhz to 1.940Mhz
1:5:1 1.950Mhz
1:2:1 1.970Mhz Feed Point impedance here is 51 ohms
1:3:1 1,972Mhz
1:5:1 1.980Mhz
1:8:1 1990Mhz
1:9:1 2.000Mhz
Cheers Simon